#6 Debian-testing + BTRFS + Encrypted Install
Burn Debian ISO to USB
On Windows :
https://www.balena.io/etcher/
On Linux , first plugin USB drive and find which device path is allocated .
Best is running a GUI program "gnome-disks" . :
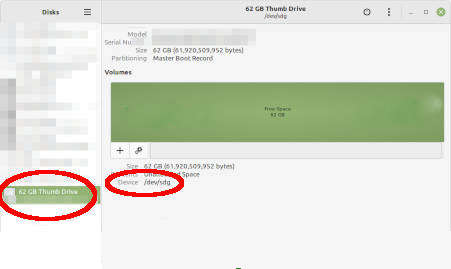
Selecting the USB drive. At details you will see path such as /dev/sde
Then open a root shell and transfer the ISO to /dev/sde
# dd if=/home/kusanagi/Downloads/debian-11.6.0-amd64-netinst.iso of=/dev/sde status=progress

# sync
Boot machine
Then remove the USB drive and plugin into target machine , boot up and
press F12 or F8 depend on BIOS, to select boot device. Select USB drive .
Boot with UEFI mode , we need for having a EFI partition .
Debian installer will start.
For testing installation is best to try on hypervisor ,which
lets you run multiple operating systems as virtual machines.
Create a new virtual machine and select the downloaded Debian ISO .
Deselect "automatically power on virtual machine after powering on" .
Edit virtual machine settings -> Options -> Advanced tab ->
Firmware type. Select UEFI.
Expert install
Choose advanced options -> choose Expert install
Choose language .
Configure keyboard .
Detect and mount installation media.
Load installer components from installation media.
We might need fdisk component for partitioning later.
Later guided partitioning will load Crypto-dm-modules and rescue-mode for
making available cryptsetup command we will use for
creating custom encrypted volumes.
Those modules are only needed if you will not Partition disks with
a provided Debian installer.
Detect network hardware.
Auto configure network.
Choose hostname. Can left domain name empty.
Setup users and password:
Enable shadow passwords. Not allow root login.
Create new user with secure password.
Configue clock: Setup NTP .
Detect disks.
Partion disks.
Guided - use entire disk and set up encrypted LVM
Select disk to partition
All files in one partition. Because you are a new user, do you?
Write the changes to disk and configure LVM. Yes
Now installer is erasing data on disk partition.
If disk is totally new, just testing or previous usage
does not contain sensitive data, then erasing can be skipped by Cancel
Choose passphrase for encrypt SCSI (0,0,0), partition #3 (sda).
Choose "123", or anything, does not matter . We will recreate encrypted volume
later.
Confirm Yes to use weak passphrase.
Name of volume group : debian-vg
Amount of volume group to use for guided partitioning:
Choose what is provided ,which is all disk space.
You can see the overview of partitions .
We have one volume group debian-vg consume all disk space.
In debian-vg are two logical volumes : root and swap_1 .
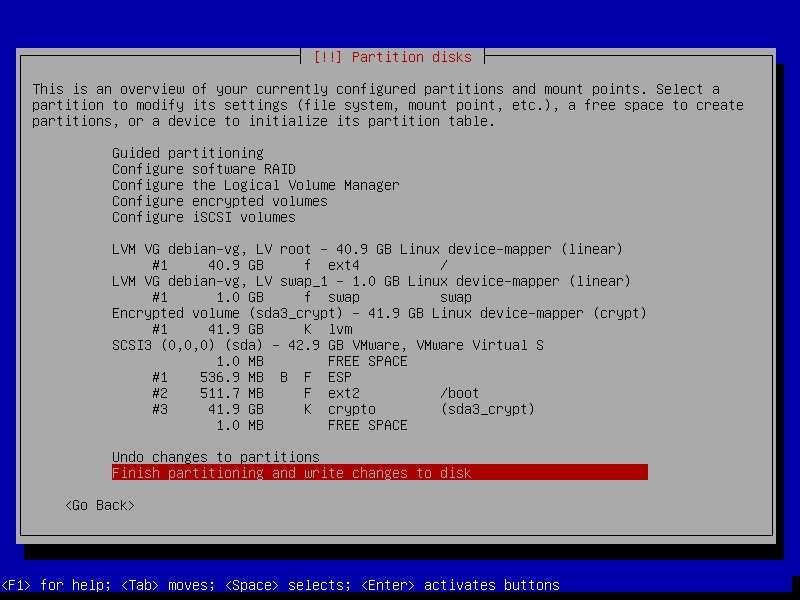
Finish partitioning and write changes to disk.
Now the installer is in a state where partitioning is saved as a finished
step.
We will remove all of the partitioning , then customize and reach a same
disk / partition setup what the installer achieved.
Then we can continue with Install the base system, the installer will
not know what we did in the background.
Now switch to another virtual terminal by
pressing CTRL-ALT-F2.
Check disk layout :
# cat /proc/partitions
The largest size disk usually /dev/sda is the hard drive we have in the
machine.
Partition disk with fdisk
# fdisk /dev/sda
in fdisk , format the disk as GTP by command letter g
Create first partition in fdisk by letter n, size about 512M
Change partition type , letter t command . Type code : 1 .
Create second partition for /boot : size 512M
Create third partition for /root , rest of the space .
About Swapfile
swapfile only works if BTRFS have set no-COW (no copy on write).
By default BTRFS have COW , that means we can't use swapfile on BTRFS.
Setting BTRFS to not-COW would loose main benefit of BTRFS filesystem.
We will create a swap logical volume.
Backup , umount, remove volume group, remove encrypted volume
Turn off swap_1 :
swapoff /dev/mapper/debian--vg-swap_1
Backup /target directory :
Umount /target , efi and boot :
umount /target/boot/efi
umount /target/boot/
umount /target/
Remove logical volumes : root and swap_1
lvremove /dev/mapper/debian--vg-swap_1
lvremove /dev/mapper/debian--vg-root
Remove volume group and physical volumes :
vgremove debian-vg
pvremove /dev/mapper/sda3_crypt
Close encrypted volume :
cryptsetup close /dev/mapper/sda3_crypt
Create encrypted volume
# cryptsetup -y -v --label=LABEL --key-size 512 --hash sha512 luksFormat /dev/sda3
Note : You can benchmark to see keysize and hash is good for your taste ,
or you might want to go with defaults.
# cryptsetup benchmark --key-size 512 --hash sha512

# cryptsetup --help
End of the listing should show like
Default compiled-in device cipher parameters:
loop-AES: aes, Key 256 bits
plain: aes-cbc-essiv:sha256, Key: 256 bits, Password hashing: ripemd160
LUKS: aes-xts-plain64, Key: 256 bits, LUKS header hashing: sha256, RNG: /dev/urandom
LUKS: Default keysize with XTS mode (two internal keys) will be doubled.
Now open the encrypted volume. This will be under /dev/mapper/sda3_crypt
# cryptsetup open /dev/sda3 sda3_crypt
Create SWAP for swap_1 logical volume
mkswap /dev/mapper/debian--vg-swap_1
BTRFS partitioning and mounts
Format "root" logical volume (this will be our root partition) with
BTRFS filesystem :
# mkfs.btrfs --label gekisroot /dev/mapper/debian--vg-root
Mount to /target :
# mount /dev/mapper/debian--vg-root /target
Create subvolumes :
#cd /target

# btrfs subvolume create @rootfs

#ls
@rootfs

# btrfs subvolume create @home

# btrfs subvolume create @snapshots

# btrfs subvolume list /target

# Make a note which ID match which subvolume.

# ls

@home @rootfs @snapshots

cd /

umount /target
subvolid must be the ID from btrfs subvolume list
#mount -o rw,noatime,space_cache=v2,compress=zstd:3,ssd,discard=async,subvolid=256 /dev/mapper/debian--vg-root /target

Omit **ssd** parameter if disk is not SSD

#mkdir /target/home

#mkdir /target/.snapshots
Create a target boot EFI dir.
#mkdir -p /target/boot/efi

#mount -o rw,noatime,space_cache=v2,compress=zstd:3,ssd,discard=async,subvolid=257 /dev/mapper/debian--vg-root /target/home

#mount -o rw,noatime,space_cache=v2,compress=zstd:3,ssd,discard=async,subvolid=258 /dev/mapper/debian--vg-root /target/.snapshots

Omit **ssd** parameter if disk is not SSD
We need to mount boot and EFI
#mount /dev/sda2 /target/boot

#mount /dev/sda1 /target/boot/efi
Copy back files, dirs from /tmp
cp -r /tmp/target/* /target
fstab
We don't have genfstab for debian. We have to manually edit fstab.:
#cd /target/etc/
#nano /target/etc/fstab
At /dev/mapper/debian--vg-root replace ext4 with btrfs.
Replace errors=remount-ro with this :
**rw,noatime,space_cache=v2,compress=zstd:3,ssd,discard=async,subvolid=257**
CTRL-K then CTRL-U twice to make three lines with same content . Change
subvolid to 258, 259
On my system , subvolid 257 was root
258 was home
259 was .snapshots
You can list subvolid with :
#btrfs subvol list /target
Save and exit from nano :
CTRL-O and CTRL-X
Check fstab content :
fstab should look like
# <file system> <mount point>   <type>  <options>       <dump>  <pass>
/dev/mapper/debian--vg-root /               btrfs   rw,noatime,space_cache=v2,ssd,discard=async,subvolid=257 0       0
/dev/mapper/debian--vg-root /home               btrfs   rw,noatime,space_cache=v2,ssd,discard=async,subvolid=258 0       0
/dev/mapper/debian--vg-root /.snapshots               btrfs   rw,noatime,space_cache=v2,ssd,discard=async,subvolid=259 0       0

# /boot/efi was on /dev/sda1 during installation

UUID=AF69-7740  /boot/efi       vfat    umask=0077      0       1

UUID="9315574b-3269-4d63-8d85-7a6ca0f4d5e9" /boot       ext4    rw,relatime     0       2

/dev/sr0        /media/cdrom0   udf,iso9660 user,noauto     0       0

/dev/mapper/debian--vg-swap_1     none    swap    sw      0       0
Done setting up fstab.
crypttab
At boot time Linux will need crypttab file for mounting our encrypted volumes.
(root and swap)
blkid | grep sda3:>> /target/etc/crypttab

nano /target/etc/crypttab
You need to do a bit of inconvenient editing with nano, but CTRL-K (cut line)
and CTRL-U (paste line) helps .
should look like this :
sda3_crypt UUID="2f78THIS-YOUR-UUID-876f-d64ff21f121f" none luks,discard
The first field, target, describes the mapped device name.
The second field, source device, describes either the block special device.
The third field, key file, describes the file to use as a key for decrypting the data of the source device.
The fourth field, options :
luks : use luks mode.
- discard
-
Allow using of discards (TRIM) requests for device.
Starting with Debian 10 (Buster), this option is added per default to new dm-crypt devices by the Debian Installer. If you don't care about leaking access patterns (filesystem type, used space) and don't have hidden
truecrypt volumes inside this volume, then it should be safe to enable this option. See the following warning for further information.
WARNING: Assess the specific security risks carefully before enabling this option. For example, allowing discards on encrypted devices may lead to the leak of information about the ciphertext device (filesystem type, used
space etc.) if the discarded blocks can be located easily on the device later.
Check if crypttab is indeed have sda3 UUID
blkid

cat /target/etc/crypttab
Continue with base system install.
CTRL-ALT-F1 back to installer.
If graphical installer then the installer should be at CTRL-ALT-F5.
Continue with installation.
Go with selection of generic drivers.
We will install most of the stuff with debian testing .
Select network mirror.
Choose fastest mirror for your region.
Select yes or no for non-free software.
Yes or no for enable source repositories in APT .
Remove all selection at "Configure the package manager", since we will go
with Debian testing .
Configure discover updates management.
Continue popularity-contest.
Software selection . Remove all selection except "standard system utilities".
Install grub.
Do not (???) force GRUB installation to the EFI removeable media path.
Finish .
Remove install media.
Reboot.
Login.
change font size
sudo dpkg-reconfigure console-setup
Choose UTF-8
Font for console : Terminus.
Choose font size.
Change apt source to TESTING
sudo vim /etc/apt/sources.list.
Remove bullseye and replace with testing.
#sudo apt update
nala replaces apt and very cool frontend for apt, it can run parallel .
#sudo apt install nala
#sudo nala upgrade
Select Restart services .
Install finished. Reboot.
#sudo reboot
TODO later reflector
swapfile
If filesystem is not BTRFS and no swap partition then we can have a swapfile
#sudo nala install zram-tools
#sudo vim /etc/default/zramswap
Uncomment ALGO and change to zstd.
and set PERCENT=25
#sudo nala install task-cinnamon-desktop
This takes a time...
Test timeshift
#sudo apt install timeshift
Reboot.
Login to xfce .
Start timeshift. Select BTRFS. Select snapshot location .
Select snapshot levels .
Include @home subvolume
Finish.
